Glue section
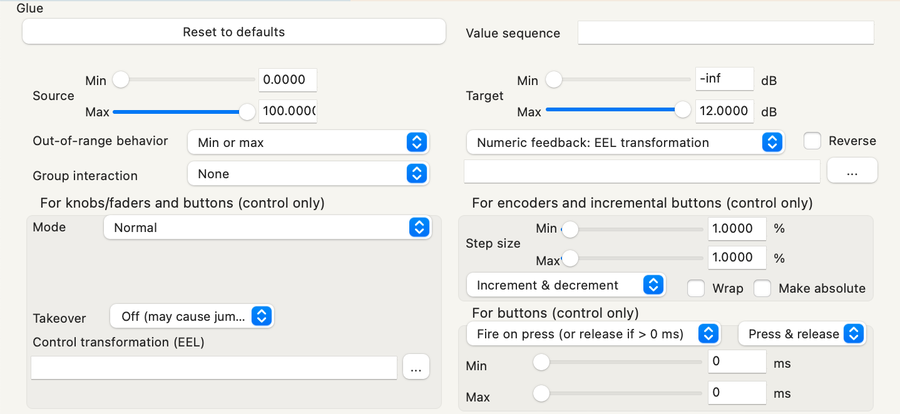
The Glue section is divided into several subsections some of which make sense for all kinds of sources and others only for some. Having so many settings available at the same time can be a bit daunting. ReaLearn helps you by hiding settings that don’t make sense in the current context.
It shows or hides them based on criteria like this:
-
Is control and/or feedback enabled for the mapping?
-
What are the characteristics of the source and target?
-
What’s the current setting of Mode ("Absolute mode") menu and Make absolute?
Reverse checkbox
- Control →
-
inverses incoming absolute control values and changes the direction of incoming relative control values
- Feedback ←
-
inverses the feedback value
Depending on the context, this can have different effects:
| Element | Direction | Effect |
|---|---|---|
Momentary button |
Control → |
Switches the target off when pressed and on when released |
Range element (fader, knob, …) |
Control → |
The higher the fader position, the lower the target value |
Incremental button |
Control → |
Decreases the target value on press instead of increasing it |
Rotary endless encoder |
Control → |
Decreases the target value when turning clockwise and decreases it when turning counter-clockwise |
LED |
Feedback ← |
Uses off LED color if target is on and on LED color if target is off |
Value indicator (LED ring, motor fader, …) |
Feedback ← |
The higher the target value, the lower the indicated value |
Target Min/Max controls
- Control →
-
sets the controlled value range of the target, making sure that the target value ends up within that range
- Feedback ←
-
sets the observed range of feedback values coming from the target
If you set this to "-6 dB to 0 dB" for a Track volume target, the volume will always stay within that dB range when controlled via this mapping. However, it wouldn’t prevent the volume from exceeding that range if changed e.g. in REAPER itself.
This setting can be used with all targets that work with absolute control values (all targets except Target "Project: Invoke REAPER action" with relative Invocation type).
Value sequence field
- Control →
-
sets discrete target values to step through
Allows you to define a Target value sequence. All values are entered comma-separated using the target unit specified with the Display unit button.
You can provide only one of Target Min/Max controls or Value sequence field.
Group interaction
- Control →
-
allows controlling not only this mapping but also all other mappings in the same group
See Mapping group.
| If you want to control other mappings only and not this mapping, just pick a target that doesn’t have any effect, for example the Target "ReaLearn: Dummy". |
- None
-
Switches group interaction off. This is the default. Incoming control events will just affect this mapping, not others.
- Same control
-
This will broadcast any incoming control value to all other mappings in the same group. The glue section of this mapping will be ignored when controlling the other mappings. The glue sections of the other mappings will be respected, including the Source Min/Max controls.
- Same target value
-
This will set the target value of each other mapping in the same group to the target value of this mapping. Nice: It will respect the Target Min/Max controls of both this mapping and the other mappings. All other settings of the glue section will not be processed. Needless to say, this kind of control is always absolute, which means it can lead to parameter jumps. Therefore, it’s most suited for on/off targets. If you don’t like this, choose Same control instead.
- Inverse control
-
This is like Same control but broadcasts the inverse of the incoming control value.
- Inverse target value
-
This is like Same target value but sets the target values of the other mappings to the inverse value. This is very useful in practice with buttons because it essentially gives you exclusivity within one group. It’s a great alternative to the Exclusive menu which is available for some targets. Unlike the latter, Inverse target value allows for exclusivity between completely different target types and completely custom groupings - independent of e.g. organization of tracks into folders.
- Inverse target value (on only)
-
Variation of Inverse target value that applies the inverse only when the target value is > 0%.
- Inverse target value (off only)
-
Variation of Inverse target value that applies the inverse only when the target value is 0%.
Feedback type controls
- Feedback ←
-
specifies whether to send simple numeric, simple text or script-generated feedback values to the source
See Feedback type.
Feedback style menu (…)
The … button provides options to change the feedback style. At the moment, it’s all about setting colors.
| If you use Dynamic feedback: Lua script, changes made here don’t have any effect because you are supposed to provide style properties as part of the Luau script result (which is much more flexible). |
- Color / Background color
-
With this you can define the color and background color of the displayed text. Of course this will only work if the source supports it!
- <Default color>
-
Chooses the default color, that is the one which is preferred for the corresponding controller and display type.
- <Pick color…>
-
Opens a color picker so you can choose the color of your choice.
- Property name
-
Maybe you don’t want a fixed color but a dynamic one that changes whenever your target changes. Choose one of the properties to make that happen. Do a full-text search in the reference to learn about the meaning of the property.
Source Min/Max controls
- Control →
-
sets the observed range of absolute control values coming from the source
- Feedback ←
-
sets the minimum and maximum feedback value
Doesn’t have an effect on relative control values.
Depending on the context, this can have different effects:
| Element | Direction | Effect |
|---|---|---|
Momentary button |
Control → |
If min > 0 and Out-of-range behavior menu is Ignore, button releases are ignored. Because this also affects Feedback ←, it’s usually better to use the Button filter menu instead! |
Velocity-sensitive button (key, pad, …) |
Control → |
Defines the observed velocity range, for example to react to only the lower velocity layer of a key press. |
Range element (fader, knob, …) |
Control → |
Defines the observed value range. For example to react only to the upper half of a fader. |
LED |
Feedback ← |
On many controllers which support colored LEDs, Min sets the off color and Max sets the on color. |
Value indicator (LED ring, motor fader, …) |
Feedback ← |
Sets the lowest/highest indicated value. |
By restricting that range, you basically tell ReaLearn to or only the lower velocity layer of a key press.
This range also determines the minimum and maximum Feedback value.
Out-of-range behavior menu
- Control →
-
determines what to do if the absolute control value coming from the source is not within source min/max
- Feedback ←
-
determines what to do if the feedback value is not within target min/max
There are the following options:
| Control → | Feedback ← | |
|---|---|---|
Min or max |
If the source value is < Source Min, ReaLearn will behave as if Source Min was received (or 0% if Source Min = Source Max). If the source value is > Source Max, ReaLearn will behave as if Source Max was received (or 100% if Source Min = Source Max). |
If the target value is < Target Min, ReaLearn will behave as if Target Min was detected (or 0% if Target Min = Target Max). If the target value is > Target Max, ReaLearn will behave as if Target Max was detected (or 100% if Target Min = Target Max). |
Min |
ReaLearn will behave as if Source Min was received (or 0% if Source Min = Source Max). |
ReaLearn will behave as if Target Min was detected (or 0% if Target Min = Target Max). Useful for getting radio-button-like feedback. |
Target value won’t be touched. |
No feedback will be sent. |
Mode ("Absolute mode") menu
- Control →
-
specifies how incoming absolute control values are interpreted and handled
Not all modes make sense at all times!
It mostly depends on the character of the source.
If a mode doesn’t make sense given the current source, it will be marked as NOT APPLICABLE.
In this case, you should choose another mode or change the source.
|
- Normal
-
Takes and optionally transforms absolute source control values the normal way. Normal means that the current target value is irrelevant and the target will just be set to whatever absolute control value is coming in (potentially transformed).
- Incremental button
-
With this you can "go relative" with buttons instead of encoders in a "previous/next fashion".
Let’s assume you use the MIDI Note velocity and select Incremental button mode. Then it works like this: Each time you press the key, the target value will increase, according to the mode’s settings. You can even make the amount of change velocity-sensitive! If you want the target value to decrease, just check the Reverse checkbox.
Round target value checkbox
- Control →
-
rounds target values to the nearest integer
Only a few targets support that, such as Target "Project: Set tempo".
Takeover mode menu
- Control →
-
defines how to deal with potential control value jumps
If you are not using motorized faders, absolute mode is inherently prone to parameter jumps. A parameter jump occurs if you touch a control element (e.g. fader) whose position in no way reflects the current target value. This can result in audible jumps because the value is changed abruptly instead of continuously. You can deal with this by setting the right takeover mode.
ReaLearn provides multiple takeover modes that decide how to deal with situations when a target parameter jump would occur.
- Off
-
The default setting: Jumps allowed.
- Pick up
-
This is the same as Soft takeover in REAPER’s built-in MIDI learn. It prevents jumps by not changing the target value until your control element reaches it.
In certain cases, this mode can cause the target value to get stuck. This happens with faders/knobs that cause jumps themselves when moved very rapidly. If you don’t like that, you might want to try Pick up (tolerant).
- Pick up (tolerant)
-
This is like Pick up but makes extra sure that the target value doesn’t get stuck.
However, unlike Pick up, this mode will jump if you cause a jump on your controller! Imagine using a touch strip. This kind of control element allows you to jump to arbitrary values at any time. Tolerant mode will not prevent this kind of jumps!
- Long time no see
-
This is similar to Pick up with the difference that the current target value will gradually "come your way". This results in seamless and fast reunification of control and target value, but it can feel weird because the target value can temporarily move in the opposite direction of the fader movement. In older ReaLearn versions this was called "Slowly approach if jump too big".
- Parallel
-
With this mode, the target will simply follow your fader moves, in exactly the same tempo - without any scaling. Reunification only happens when both control and target value meet at the "borders".
- Catch up
-
This mode is sometimes called "Proportional" or "Value scaling" mode. It’s like "Parallel" mode but the target value is allowed to move slower than the control value - hence the control can catch up (converge) faster.
Control transformation (EEL) field
- Control →
-
applies highly customizable transformations or filtering to incoming absolute control values
This feature allows you to write a formula that transforms incoming control values. While very powerful because it allows for arbitrary transformations (velocity curves, random values - you name it), it’s not everybody’s cup of tea to write something like that. The formula must be written in the language EEL2. Some REAPER power users might be familiar with it because REAPER’s JSFX uses the same language.
Luckily, ReaLearn has a fancy editor which visualizes the formula and has some predefined templates built-in (available on Windows and macOS only at the moment). Press the "…" button to open the editor. Code changes are applied immediately.
The most simple formula is y = x, which means there will be no transformation at all. y = x / 2 means that incoming control values will be halved.
You get the idea: y represents the desired target control value (= output value) and x the incoming source control value (= input value).
Both are 64-bit floating point numbers between 0.0 (0%) and 1.0 (100%).
The script can be much more complicated than the mentioned examples and make use of all built-in EEL2 language features.
The important thing is to assign the desired value to y at some point.
The following variables/functions are available in the formula:
y-
Initially contains the current target value. You can use that value in order to calculate the new value. With this, you can essentially craft your own relative mode!
y_type-
This contains the type of the produced output value. By default, it’s 0. The following types are currently supported:
0-
Absolute continuous value (a value between 0.0 and 1.0)
1-
Relative discrete value (an integer, e.g. -5 for 5 decrements)
realearn_timestamp-
This contains the precise timestamp of the incoming control event in seconds. This can be used to calculate the delta time between two consecutive control events, which in turn can be used to simulate encoder acceleration, for example.
The timestamp has audio block precision. For MIDI events, it even takes the intra-block offset into account - which is as precise as it can get, even if you use a high audio buffer size in the REAPER audio device settings.
y_last-
This contains the last value of the target before it was affected by this particular mapping.
Allows you to come up with a performance control mode typical for synth parameter mappings, just like the built-in Performance control mode but more customizable. Try this for example:
y = y_last + x * (1 - y_last) rel_time-
This contains the number of milliseconds since this mapping has last been triggered with a control message coming from the source.
As soon as you use this and a control message comes in, ReaLearn will start invoking your formula repeatedly! That means, this variable is your entrance ticket to smooth transitions and continuous parameter modulation.
A few examples:
-
Smooth transition from current value to control value:
rel_time; y = abs(x - y) < 0.05 ? stop : y + 0.1 * (x - y) -
Sinus LFO:
y = (sin(rel_time / 500) + 1) / 2 -
Linear transition to control value (1 second):
y = abs(x - y) < 0.05 ? stop : x * min(rel_time / 500, 1) -
2 seconds chaos:
y = rel_time < 2000 ? rand(1) : stop -
Setting a value with delay:
y = rel_time < 2000 ? none : stop(0.5)
-
stopandstop(…)-
In combination with
rel_time, this stops repeated invocation of the formula until the mapping is triggered again.Good for building transitions with a defined end.
Stopping the invocation at some point is also important if the same parameter should be controlled by other mappings as well. Otherwise, if multiple mappings continuously change the target parameter, only the last one wins.
This also exists as a function, which lets you do both, returning a target value and stopping the transition. Pass the desired value in the parentheses, e.g.
stop(0.5). none-
Usually, each repeated (see
rel_time) invocation always results in a target invocation (unless the target is not retriggerable and already has the desired value). Sometimes this is not desired. In this case, one can returnnone, in which case the target will not be touched.Good for transitions that are not continuous, especially if other mappings want to control the parameter as well from time to time.
realearn_last_feedback_value-
Contains the last numeric feedback value sent through this mapping. Before that, it’s zero. This can come in handy for mappings with Virtual target, for which the variable
yis always zero because virtual targets don’t know the concept of a current value.This variable is experimental, better don’t rely on it! realearn_dbg()-
This is a function which takes a floating-point value as parameter. It prints that floating-point value to
stdout(not the ReaScript debug console!). Useful for debugging.
Learn more about the order in which ReaLearn processes the elements in the glue section by looking at the Glue signal flow diagrams.
Step size Min/Max controls
- Control →
-
specifies by which amount to increase the target value when an increment or decrement is received
When you deal with relative adjustments of target values in terms of increments/decrements, then you have great flexibility because you can influence the amount of those increments/decrements. This is done via the Step size setting, which is available for all continuous targets.
- Step size Min
-
Specifies how much to increase/decrease the target value when an increment/decrement is received.
Depending on the context, this can have different effects:
| Element | Direction | Effect |
|---|---|---|
Incremental button |
Control → |
Sets the target value change amount when button pressed |
Incremental velocity-sensitive button (key, pad, …) |
Control → |
Sets the target value change amount when button pressed with the lowest velocity |
Rotary endless encoder |
Control → |
Sets the target value change amount for an incoming non-accelerated increment/decrement |
Rotary endless encoder with Make absolute |
Control → |
Sets the amount added/subtracted to calculate the simulated absolute value from an incoming non-accelerated increment/decrement |
- Step size Max
-
Sets the maximum amount by which to increase/decrease the target value with one interaction. If you set this to the same value as Min, encoder acceleration or changes in velocity will have no effect on the incrementation/decrementation amount. If you set it to 100%, the effect is maximized.
Depending on the context, this can have different effects:
| Element | Direction | Effect |
|---|---|---|
Incremental velocity-sensitive button (key, pad, …) |
Control → |
Sets the target value change amount when button pressed with the highest velocity |
Rotary endless encoder |
Control → |
If the hardware encoder supports acceleration, this sets the target value change amount for the most accelerated increment/decrement |
Speed Min/Max controls
- Control →
-
specifies how often to increase or decrease the target value when an increment or decrement is received
When you choose a target with a Discrete value range, the Step size Min/Max controls label will change into Speed. If a target is discrete, it cannot have arbitrarily small step sizes. It rather has one predefined atomic step size. Allowing arbitrary step size adjustment wouldn’t make sense. That’s why Speed allows you to multiply (positive numbers) or "divide" (negative numbers) value increments with a factor instead. Negative numbers are most useful for rotary encoders because they will essentially lower their sensitivity. Virtual targets are always discrete.
Let’s assume you selected the discrete Target "FX: Browse presets", which is considered discrete because an FX with for example 5 presets has 6 well-defined possible values (including the <no preset> option), there’s nothing inbetween. And let’s also assume that you have a controller like Midi Fighter Twister whose rotary encoders don’t support built-in acceleration.
Now you slightly move an encoder clock-wise and your controller sends an increment +1. If the Speed Min slider was at 1 (default), this will just navigate to the next preset (+1). If the Speed Min slider was at 2, this will jump to the 2nd-next preset (+2). And so on.
Remarks:
-
There are FX plug-ins out there which report their parameter as discrete with an insanely small step size (e.g. some Native Instrument plug-ins). This kind of defeats the purpose of discrete parameters and one can argue that those parameters should actually be continuous. In such a case, moving your rotary encoder might need a lot of turning even if you set Speed to the apparent maximum of 100! In this case you will be happy to know that the text field next to the slider allows you to enter values higher than 100.
-
You can set the "Speed" slider to a negative value, e.g. -2. This is the opposite. It means you need to make your encoder send 2 increments in order to move to the next preset. Or -5: You need to make your encoder send 5 increments to move to the next preset. This is like slowing down the encoder movement.
Encoder filter menu
- Control →
-
allows reacting to either clockwise or counter-clockwise encoder turns
For example, if you want to invoke one action on clockwise movement and another one on counter-clockwise movement. Or if you want to use different step sizes for different movements.
- Increment & decrement
-
ReaLearn will process both increments and decrements.
- Increment only
-
ReaLearn will ignore decrements.
- Decrement only
-
ReaLearn will ignore increments.
Wrap checkbox
- Control →
-
makes the target value jump back to target min when target max is reached
If unchecked, the target value will not change anymore if there’s an incoming decrement but the target already reached its minimum value. If checked, the target value will jump to its maximum value instead. It works analogously if there’s an incoming increment and the target already reached its maximum value.
If this flag is enabled for controller mappings which have a virtual target, every main mapping controlled by that virtual control element will wrap - even if the main mapping itself doesn’t have Wrap checkbox enabled.
Make absolute
- Control →
-
emulates an absolute control element with a relative encoder or with -/+ buttons (= incremental buttons)
This is useful if you have configured your controller to be relative all the way (which is good!) but you want to use a control transformation EEL formula - which is not possible if you change the target with relative increments. It works by keeping an internal absolute value, incrementing or decrementing it accordingly and then processing it just like normal absolute control values.
By checking this box:
-
You lose the possibility to be perfectly free of parameter jumps (but you can try to mitigate that loss by using the jump settings).
-
You gain support for control-direction EEL transformation, non-continuous target value sequences and source range.
-
You can still use some of the relative-only features: Step size and rotate!
Fire mode menu
- Control →
-
allows differentiating between long-press, short-press, and double-press actions
Normally, when a button gets pressed, it controls the target immediately. However, by using this dropdown and by changing the values below it, you can change this behavior. This dropdown provides different fire modes that decide how exactly ReaLearn should cope with button presses.
- Fire on press (or release if > 0 ms)
-
This mode is essential in order to be able to distinguish between different press durations.
-
Min and Max decide how long a button needs to be pressed to have an effect.
-
By default, both min and max will be at 0 ms, which means that the duration doesn’t matter and both press (> 0%) and release (0%) will be instantly forwarded. If you change Min to e.g. 1000 ms and Max to 5000 ms, it will behave as follows:
-
If you press the control element and instantly release it, nothing will happen.
-
If you press the control element, wait for a maximum of 5 seconds and then release it, the control value of the press (> 0%) will be forwarded.
-
It will never forward the control value of a release (0%), so this is probably only useful for targets with trigger character.
-
The main use case of this setting is to assign multiple functions to one control element, depending on how long it has been pressed. For this, use settings like the following:
-
Short press: 0 ms - 250 ms
-
Long press: 250 ms - 5000 ms
-
- Fire after timeout
-
This mode is more "satisfying" because it will let ReaLearn "fire" immediately once a certain time has passed since the press of the button. However, obviously it doesn’t have the concept of a "Maximum" press duration, so it can’t be used to execute different things depending on different press durations (or only as the last part in the press duration chain, so to say).
- Timeout
-
Sets the timeout in milliseconds. If this is zero, everything will behave as usual.
- Fire after timeout, keep firing (turbo)
-
Welcome to turbo mode. It will keep hitting your target (always with the initial button press velocity) at a specific rate. Optionally with an initial delay. Epic!
- Timeout
-
This is the initial delay before anything happens. Can be zero, then turbo stage is entered instantly on press.
- Rate
-
This is how frequently the target will be hit once the timeout has passed. In practice, it won’t happen more frequently than once every 30 ms (REAPER’s main thread loop frequency).
- Fire on double press
-
This reacts to double presses of a button (analog to double-clicks with the mouse).
- Fire after single press (if hold < Max ms)
-
If you want to do something in response to a double press, chances are that you want to do something else in response to just a single press. The Normal fire mode will fire no matter what! That’s why there’s an additional Single press mode that will not respond to double presses. The response happens slightly delayed - because ReaLearn needs to wait a bit to see if it’s going to be a double press or not.
- Max
-
With this, it’s even possible to distinguish between single, double and long press. In order to do that, you must set the Max value of the Single press mapping to a value that is lower than the Timeout value of your After timeout mapping. That way you can use one button for 3 different actions!
-
Mapping 1 "Single press" with Max = 499ms
-
Mapping 2 "Double press"
-
Mapping 3 "After timeout" with Timeout = 500ms
-
Button filter menu
- Control →
-
allows reacting to either button press or button release events
- Press & release
-
ReaLearn will process both button presses (control value = 0%) and button releases (control value > 0%). This is the default.
- Press only
-
Makes ReaLearn ignore the release of the button. The same thing can be achieved by setting Source Min to 1. However, doing so would also affect the feedback direction, which is often undesirable because it will mess with the button LED color or on/off state.
- Release only
-
Makes ReaLearn ignore the press of the button (just processing its release). Rare, but possible.